Baked Garlic Butter Salmon Recipe: A Must-Try

Lately, we have been eating a lot of meat. So I decided to cook something different. It should be something that my choosy son, Zach, could and would eat.

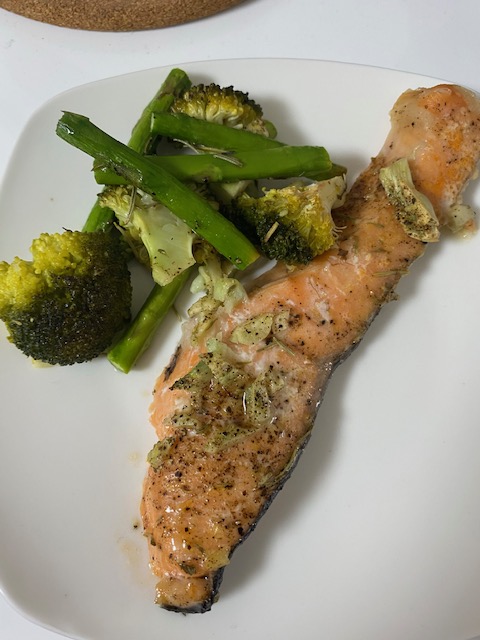
Since it is a holiday here in Japan today (the Autumn Equinox Day), I had time to cook. I decided to have fish with lots of vegetables for lunch. I went through my recipe notebook and I saw my Baked Salmon Recipe.

I found this recipe while browsing the internet last April. We were quarantined at home due to the State of Emergency that was declared in Japan. I was then looking for a new recipe to try because I was so bored at home that all I did at that time was cook/bake, eat, watch TV, sleep, and repeat. Although the recipe was a total success when I gave it a try, I completely forgot about it and I even forgot to share it here in my blog…sorry!

Anyway, the original recipe had only broccoli as the side veggie. I love veggies so I put all the veggies which I think would go well with the salmon: broccoli, asparagus, and green beans. I would have put some potatoes but I was worried that they might not cook well because the salmon fillets need less time in the oven. Perhaps next time, I will find a way to add those potatoes in.

Well, enough with the chitchat! Here is one recipe that is healthy and oh so yummy! We finished everything in just one sitting! I’m sure your family will love it as much as we do. Happy cooking!

Baked Garlic Butter Salmon

  • 5-6 pcs salmon fillets
  • broccoli florets
  • asparagus
  • green beans

For the Garlic Butter Sauce

  • 4 cloves garlic, minced
  • 6 tbsp unsalted butter, melted
  • 1 tbsp light brown sugar
  • ½ tsp dried oregano
  • ½ tsp  dried thyme
  • ½ tsp dried rosemary
  • salt and ground pepper to taste
  • 1 pc lemon, halved
  • dried parsley for garnish
  1. Preheat oven to 200°C
  2. Cover the pan with oven paper. You can also grease the pan with cooking spray but I prefer using the oven paper because it’s less messy and it’s easier to clean.
  3. Arrange the vegetables and salmon fillets on prepared pan
  4. Rub minced garlic over each fillet then set aside
  5. In a mixing bowl whisk together melted butter, brown sugar, oregano, thyme, and rosemary
  6. Pour the butter mixture over the salmon and veggies
  7. Take half of a lemon and squeeze lemon juice over everything
  8. Season with salt and pepper
  9. Place the pan in the oven and cook for 15-20 minutes, or until the fish flakes easily with a fork 
  10. Serve with lemon slices

Summer Time is Avocado Ice Cream Time!

Avocado Ice Cream


It’s summer time already here in Tokyo! It’s quite late actually and we even thought it would not come. But then, here it is now!

I have a love/hate relationship with the summer season.

I hate it because of its sizzling heat. Tokyo can become extremely hot. It could feel like being in an oven…and I am not exaggerating! It’s quite humid too, so wearing makeup is absolutely a struggle. And currently, because of COVID-19, summer has become more difficult because of the mask. We wear masks here whenever we’re outside and even inside the school. It is really a bummer because wearing one makes it hard to breathe while walking especially in this sweltering heat. But hey, it’s better to wear a mask than be infected with the coronavirus, right?

Anyway, going back to summer…

I love summer because I don’t have to wear layers of clothing so getting ready in the morning is such a breeze.

Secondly, I love summer because I love the sound of the cicadas in the trees. I know that this may sound weird but the cicadas’ sound makes me happy. It gives me comfort. When I hear them, their sound is like telling me that everything will be alright. Strange, huh? My hair stylist, who is Japanese, finds it really strange and she said that I’m the first person she encountered who loves hearing the cicadas. Hahaha! She thinks that they’re too noisy!

Then lastly, another thing I love about summer is that I can give myself an excuse to eat ice cream. You know, the it’s-very-hot-so-it’s-just-right-to-eat-ice cream-now! reason. I am on a diet so I don’t usually eat ice cream not unless I really crave for it. But summer time is ice cream time! Yay!

For today, I will share with you my recipe for avocado ice cream. It’s simple, creamy, healthy and very delicious. I love avocados. I grew up watching my Aunt Barbara while she made avocado with milk for snacks. She would mix the avocado, evaporated milk and sugar then put the mixture in the fridge. It was a very healthy snack. 

So how did I come up with this avocado ice cream idea?

One summer week, I have to introduce avocados to kids in my class and I needed to come up with an avocado recipe that they would love to eat. We would then make the recipe all together so they would remember and really learn what an avocado is. That is one of my teaching techniques, by the way. I call it the “Involve Me and I Learn Technique”.

I didn’t consider the simple avocado recipe that I learned from my Aunt Barbara because there were avocado chunks in the mixture which my 2-3 year old kids had to chew in class. And for this age group, chewing is a daunting task. They usually just swallow what they eat. Besides, when I asked them what they wanted to make, they just blurted out, “ice cream!” So ice cream it is.

Finally, after much googling, I found this recipe in the internet and we have been making it in my class for two years now and I have been making it at home every week for two summers now. 

This ice cream recipe only needs 3 ingredients! Without further ado, here’s the recipe…Enjoy!!!

3-Ingredient Avocado Ice Cream

  • 2 large ripe avocados (or 3 small ripe avocados)
  • 200 ml condensed milk
  • 200 ml heavy cream
  1. In a food processor (you can also use a blender), add peeled avocados and condensed milk.
  2. Mix them on high speed until it forms into a smooth mixture. Make sure that the mixture does not have chunks of avocado.
  3. Put the mixture in a mixing bowl.
  4. Add the heavy cream and mix well.
  5. Transfer the mixture into a glass container or ice cream molder and put it in the freezer.
  6. Freeze the ice cream for at least 8 hours or preferably overnight.
  7. Enjoy this creamy and delicious avocado ice cream!!!

Lemon Bars

Lemon Bars

I love sweets…who doesn’t? However, since I am careful with my sugar consumption and because I am now on a diet, I limit myself to only one dessert a day. But in spite of that, I still haven’t reached my ideal weight yet. Sigh! Just a mere .5 kilo and yet, it is so difficult to attain— especially now with the stay-at-home request from the Tokyo Governor.

Ever since I started working from home, I get to eat lunch and dinner with my kids everyday. “Why not breakfast?”, you might ask. Well, nobody in this house wakes up early! Sigh again!

Anyway, since I get to eat with the kids now, I get to finally chit chat with them (yup…no phones, no iPad and no TV while eating). But the chit chat ends when they finish eating. So like any other typical mom, I want them to stay longer at the dining table so I can chat with them longer . What is the best thing to do then? Bake them desserts that they definitely love!

One sunny quarantine day, I casually told them that since I wasn’t as busy as before, I could bake them something. They got excited and they started flipping through my recipe notebook. They didn’t like apple pie at that time, and cupcakes with frosting are just too much work for me. They then settled with lemon bars.

The first time I baked these lemon bars, they were an epic failure. They were too dry and the crust was too hard. I definitely thought I sucked at these dessert bars so I stopped baking them altogether. That was two years ago.

But on that day when my kids wanted me to bake lemon bars for them, these sweeties turned out to be really good! So from then on, we eat lemon bars with freshly brewed coffee (except for Zach) right after lunch. And from then on, I have been baking lemon bars every week!

So for my blog today, I will share with you my recipe for lemon bars. I got this recipe from my cousin who loves baking as much as I do. You can check her account on Instagram: The Bad Brownies.

I hope that through these lemon bars, you will also be able to encourage your kids to stay longer at the dinner table just to have those treasured chit chats with you…like what I did (and do).

Have fun baking!

Lemon Bars Recipe

For the Crust

  • 2 cups All-Purpose Flour
  • 2 sticks Butter, softened at room temperature
  • ¾ cup Powdered Sugar

For the Filling:

  • 3 large eggs
  • 1 cup sugar
  • 3 tbsp All-Purpose Flour
  • ¾ tsp Baking Powder
  • 2 tbsp Lemon Juice
  • 1 tsp Grated Lemon Peel
  • Powdered Sugar to sprinkle on top of the bars

For the Crust:

  1. Combine flour, butter, and powdered sugar. Mix until it resembles coarse crumbs. I use hand mixer for this process.
  2. Pat into an 8 x 8 baking pan. Bake at 180°C for 21 minutes.

For the Filling:

  1. Beat eggs.
  2. Add sugar, flour, baking powder, lemon juice and lemon peel.
  3. Beat until frothy.
  4. Pour over the crust.
  5. Bake for 21 minutes or until light golden brown. Do not over cook.
  6. Cool on a wire rack.
  7. Sprinkle with powdered sugar before serving.